Walls
Now we have a floor, we could do with some walls to define the shape of the room.
We need a set of wall tiles, so go and grab a set from the graphics section. I'll be using the basic wall set, but you can use whatever you like. Just remember to change the references in your code that will be different to mine if you use another tile set.
Now you have the file, make sure it is in your exped working directory.
As we did with the floor tiles, we need to insert the tile set into the ROM.
If you downloaded the binary format tiles, insert the following code.
; This is the main game loop, put your code here.
        jp loop

crossfloor:
 incbin "cross.bin"
basicwall:
 incbin "baswall.bin"

;***************************************************
; Main Memory area
;       Use this area to store variables etc
;
If you downloaded the asm format tiles, insert the following code.
; This is the main game loop, put your code here.
        jp loop

crossfloor:
 include "cross.asm"
basicwall:
 include "baswall.asm"

;***************************************************
; Main Memory area
;       Use this area to store variables etc
;
Again, like the floor tiles, we need to copy the data to somewhere useful.
Because in expedition we will never use the wall tiles as sprites moving across the screen, we can place the data in one of the areas we reserved for the exclusive use of the background and window tiles.
We'll use the twelve tiles in the second tile area of bank one after the floor tiles. These tiles are numbered 4 to 15. Update your tile planner sheet and let's get on with making it work.
We need to copy the tile data into the appropriate section of the tile data area in the gameboy. We already have the code snippet to do this, so simply insert the following code:
 ld      a,0                    ; bank 0
 ld      h,1			; high tile set
 ld      d,0			; tile reference 0
 ld      e,4			; 4 tiles to copy
 ld      bc,crossfloor		; where the data is
 call    copy_tile_data		; call the routine

 ld	 a,0			; bank 0
 ld	 h,1			; high tile set
 ld	 d,4			; tile reference 4
 ld	 e,12			; 12 tiles to copy
 ld	 bc,basicwall		; where the data is
 call	 copy_tile_data		; call the routine

 ld      hl,$9800		; the start of the background data
 ld      b,0			; the first tile of the 2x2 tile
 ld      c,0                    ; use palette 0
 ld      a,0                    ; the tiles are in bank 0
 call    bgtile_double		; call the routine
That piece of code will copy the tile data into the correct place.
Now we have the wall edges and corners, we need something to fill the bits between. A simple texture set will do, and we can use it for other things later. I'll be using the txture1 set, but you can use whatever you like. Just remember to change the references in your code that will be different to mine if you use another tile set.
Now you have the file, make sure it is in your exped working directory.
As we did with the wall tiles, we need to insert the tile set into the ROM.
If you downloaded the binary format tiles, insert the following code.
; This is the main game loop, put your code here.
        jp loop

crossfloor:
 incbin "cross.bin"
basicwall:
 incbin "baswall.bin"
texture1:
 incbin "txture1.bin"

;***************************************************
; Main Memory area
;       Use this area to store variables etc
;
If you downloaded the asm format tiles, insert the following code.
; This is the main game loop, put your code here.
        jp loop

crossfloor:
 include "cross.asm"
basicwall:
 include "baswall.asm"
texture1:
 include "txture1.asm"

;***************************************************
; Main Memory area
;       Use this area to store variables etc
;
Again, like the wall tiles, we need to copy the data to somewhere useful.
Because in expedition we will never use the textures as sprites moving across the screen, we can place the data in one of the areas we reserved for the exclusive use of the background and window tiles.
We'll use the ten tiles in the second tile area of bank one after the wall tiles. These tiles are numbered 16 to 25. Update your tile planner sheet and let's get on with making it work.
We need to copy the tile data into the appropriate section of the tile data area in the gameboy. We already have the code snippet to do this, so simply insert the following code:
 ld      a,0                    ; bank 0
 ld      h,1			; high tile set
 ld      d,0			; tile reference 0
 ld      e,4			; 4 tiles to copy
 ld      bc,crossfloor		; where the data is
 call    copy_tile_data		; call the routine

 ld	 a,0			; bank 0
 ld	 h,1			; high tile set
 ld	 d,4			; tile reference 4
 ld	 e,12			; 12 tiles to copy
 ld	 bc,basicwall		; where the data is
 call	 copy_tile_data		; call the routine

 ld	 a,0			; bank 0
 ld	 h,1			; high tile set
 ld	 d,16			; tile reference 16
 ld	 e,10			; 10 tiles to copy
 ld	 bc,texture1		; where the data is
 call	 copy_tile_data		; call the routine

 ld      hl,$9800		; the start of the background data
 ld      b,0			; the first tile of the 2x2 tile
 ld      c,0                    ; use palette 0
 ld      a,0                    ; the tiles are in bank 0
 call    bgtile_double		; call the routine
That piece of code will copy the tile data into the correct place.
We now need to go and grab three more source code snippets, mult8.asm, putdtile.asm and wallmeld.asm.
Get these files and put them in your exped working directory, then insert the following code:
; code snippets
 include "copytile.asm"
 include "bgtiled.asm"
 include "colpal.asm"
 include "putdtile.asm"
 include "mult8.asm"
 include "wallmeld.asm"

crossfloor:
 incbin "cross.bin"
We need a data file for the wallmeld routine. The file is called walltab.asm. Get the file and insert the following code:
include "wallmeld.asm"

walltable:
 include "walltab.asm"

crossfloor:
 incbin "cross.bin"
Now we have the snippets inserted into the project, we can use them. First of all, we'll set up a second background palette for the walls to use. Insert the following code:
        ld      b,0             ; background palette
        ld      c,0             ; palette 0
        ld      d,3             ; colour 3
        ld      e,0             ; red value
        ld      h,0             ; green value
        ld      l,0             ; blue value
        call    colour_palette

        ld      b,0             ; background palette
        ld      c,1             ; palette 1
        ld      d,0             ; colour 0
        ld      e,31            ; red value
        ld      h,24            ; green value
        ld      l,24            ; blue value
        call    colour_palette

        ld      b,0             ; background palette
        ld      c,1             ; palette 1
        ld      d,1             ; colour 1
        ld      e,23            ; red value
        ld      h,16            ; green value
        ld      l,16            ; blue value
        call    colour_palette

        ld      b,0             ; background palette
        ld      c,1             ; palette 1
        ld      d,2             ; colour 2
        ld      e,15            ; red value
        ld      h,8             ; green value
        ld      l,8             ; blue value
        call    colour_palette

        ld      b,0             ; background palette
        ld      c,1             ; palette 1
        ld      d,3             ; colour 3
        ld      e,7             ; red value
        ld      h,0             ; green value
        ld      l,0             ; blue value
        call    colour_palette

        ret
Now we have everything in place, we can test the wall system to make sure it works. Insert the
following code:
 ld      hl,$9800		; the start of the background data
 ld	 a,0			; bank 0
 ld      b,0                    ; the first tile of the 2x2 tile
 ld      c,0                    ; palette 0
 call    bgtile_double		; call the routine

 ld      a,0                    ; bank 0
 ld      b,6                    ; y = 6
 ld      c,4                    ; start tile number 4
 ld      d,1                    ; palette = 1
 ld      e,12                   ; x = 12
 ld      hl,$9800               ; the start of the background data
 call    put_double_tile

 ld      a,0                    ; bank 0
 ld      b,6                    ; y = 6
 ld      c,4                    ; start tile number 4
 ld      d,1                    ; palette = 1
 ld      e,14                   ; x = 14
 ld      hl,$9800               ; the start of the background data
 call    put_double_tile

 ld      a,0                    ; bank 0
 ld      b,8                    ; y = 8
 ld      c,4                    ; start tile number 4
 ld      d,1                    ; palette = 1
 ld      e,12                   ; x = 12
 ld      hl,$9800               ; the start of the background data
 call    put_double_tile

 ld      a,0                    ; bank 0
 ld      b,4                    ; y = 4
 ld      c,4                    ; start tile number 4
 ld      d,1                    ; palette = 1
 ld      e,4                    ; x = 4
 ld      hl,$9800               ; the start of the background data
 call    put_double_tile

 ld      a,0                    ; bank 0
 ld      b,4                    ; y = 4
 ld      c,4                    ; start tile number 4
 ld      d,1                    ; palette = 1
 ld      e,6                    ; x = 6
 ld      hl,$9800               ; the start of the background data
 call    put_double_tile

 ld      a,0                    ; bank 0
 ld      b,4                    ; y = 4
 ld      c,4                    ; start tile number 4
 ld      d,1                    ; palette = 1
 ld      e,14                   ; x = 14
 ld      hl,$9800               ; the start of the background data
 call    put_double_tile

 ld      a,%11000011
 ldh     [$40],a
Now compile and run the code, you should see the following.
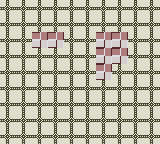
I know they don't look much like walls yet, but that's why we have the wall meld routine. What we do is pop a bunch of wall set tiles on the map, and then, when we have placed them all, we run the meld routine which tidies it all up. Insert the following code:
 ld      a,0                    ; bank 0
 ld      b,2                    ; y = 4
 ld      c,4                    ; start tile number 4
 ld      d,1                    ; palette = 1
 ld      e,7                    ; x = 6
 ld      hl,$9800               ; the start of the background data
 call    put_double_tile

 ld      hl,$9800               ; the start of the background data
 ld      b,23                   ; the filler to use
 ld      c,4                    ; the start of the wall tile set
 call    wall_meld              ; call the procedure

 ld      a,%11000011
 ldh     [$40],a
Now compile and run the code, you should see the following.
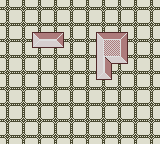
Much better isn't it. Backup your exped.asm file and have a play with the wall routine, place more wall sections around the screen and meld them. If you have a situation where the wall meld routine fails, please let me know, and send me your source code so I can correct the routine.
Once you've had fun with that, revert to the backup so that you have the same screen display as above (otherwise your later screens will never match the examples), and move to the next section.