Face Room Help:
The Face room creates heads for use with the standard Poser male and female figures. It appears as follows:
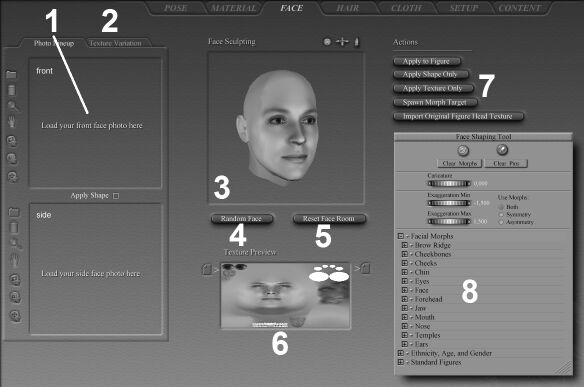
The Face room contains the following interface elements in addition to some of the standard elements:
- Photo Lineup: The Photo Lineup area (1) is where you load images and align them using a variety of tools. The texture map based on the photos gets generated on the fly. Enabling the Apply Shape checkbox also generates geometry matching your photos (on the fly).
- Texture Variation: The Texture Variation area (2) lets you apply a multitude of ethnic and other settings to modify the current head texture map.
- Face Shaping Tool window: The Face Shaping Tool window (3) displays a preview of your 3D head with textures. This window features Mini Camera controls in its upper right corner. You can also use the Face Shaping tool to sculpt the face to your exact specifications.
- Random Face button: Clicking the Random Face button (4) creates a completely random face. This will erase any prior work you’ve done in the Face room and should be used with care.
- Reset Face room button: Clicking the Reset Face room button (5) restores the default head shape and texture. This will erase all of your prior Face room work. Use this option with care.
- Texture Preview window: The Texture Preview window (6) lets you see your head texture map as you edit it and also allows you to load and save textures for further work.
- Action Buttons: The Action buttons (7) are where you import original head texture maps, apply customized head textures and/or geometries to your figures or spawn morph targets.
- Face Shaping Tool window: The Face Shaping Tool window (8) is where you control the Face Shaping tool.
Using images to create heads 1 - Tools
Using images to create heads 2 - Tips & Tricks
Creating custom textures
The Face Shaping Tool & Window
Loading/Saving/Previewing Textures
The Face room loads the default Poser texture, which is visible in the Texture Preview window. To import the currently selected figure’s original head texture, click the Import Original Figure Head Texture action button. To load a texture, click the Load Texture icon on the left side of the Texture Preview window. You can modify imported/loaded textures. To save the displayed texture, click the Save Texture icon on the right side of the Texture Preview window.
Applying Custom Textures/Shapes
Once you’ve finished making changes to the texture and/or shape, you may perform the following actions:
- Apply to Figure: Clicking the Apply to Figure button applies the head to the current figure.
- Apply Shape Only: Clicking the Apply Shape Only button applies the head shape to the currently selected figure without applying the texture map.
- Apply Texture Only: Clicking the Apply Texture Only button applies the head texture to the currently selected figure without applying the head shape.
- Spawn Morph Target: Clicking the Spawn Morph Target button allows you to save the head as a morph target.
Saving Faces
You must either save PZ3 files containing the applied head or spawn morph targets.