Yadex $VERSION ($SOURCE_DATE)
Getting started with Yadex
| If you're new to Yadex, this is what you want to read first. |
| If you're new to Yadex, this is what you want to read first. |
Yadex is a Doom level (wad) editor for Unix systems running X, including Linux. It supports Doom, Doom II, Ultimate Doom, Final Doom, Heretic and also, in a more or less limited way, Hexen and Strife. It is available under the terms of the GPL.
To compile, install and run this release of Yadex, you need
More specifically, Yadex expects that
ctype.h accept the range
CHAR_MIN through UCHAR_MAX,
hypot() function,
nanosleep() or the
usleep() system call is supported.
A shareware Doom/Heretic/Strife iwad is okay but you need a registered iwad if you want to be able to save your changes.
Yadex conforms to the FHS (filesystem hierarchy standard). The installation procedure will try to copy files in the following directories, creating the directories if they don't exist ;
/usr/local/bin
/usr/local/etc/yadex
/usr/local/share/games/yadex
So make sure you have the necessary rights before installing (or change the makefile).
Yadex uses about 270 different colours. In most cases, on PseudoColor displays, there aren't that many free colour cells. So, if it detects a PseudoColor display, Yadex uses a private colormap so as to get as many free colour cells as possible. The inconvenient of this method is that, when you're in the Yadex window, all other windows are displayed with wrong colours and vice-versa.
What's more, as PseudoColor displays typically have 256 colours (at least on PC), which is less than the number of colours needed, Yadex might have to assign the same physical colour to different logical colours. If it happens, it will try to render the colours of the game accurately at the expense of the application colours.
Monochrome displays might work but they have not been tested.
Executive summary: if you can, use a TrueColor or DirectColor
display and a depth of more than 8 bits per pixel (E.G. by
launching X with "startx -- -bpp 16").
A 640x480 screen is okay though, of course, a larger display is better.
README.
Don't forget to tell Yadex where your iwads are by changing
the lines "iwad1 =",
"iwad2 =" etc. in
/usr/local/etc/version/yadex.cfg. If
there is an iwad you don't have, you can just comment out the
corresponding line.
This section is meant to be a quick introduction to using Yadex. I assume you already know the basics of Doom editing, i.e. what vertices, linedefs, sidedefs, things and sectors are and how they work together. If you don't, it would be good idea to go get a Doom editing tutorial (see the list). If at first it seems confusing, persevere. It worked for me anyway ;-).
You must have successfully compiled, installed and configured Yadex. If you haven't, see there.
For the sake of discussion, we'll assume you want to edit MAP01 of Doom II. From the shell, type :
$ yadex -g doom2
(of course, you don't have to type the "$" !)
You should see a couple of messages
and then the Yadex prompt, which looks like this :
yadex:
At this prompt, type :
yadex: e map01
(once again, don't type the "yadex:" string !)
The editor window opens.
There you are. What you should see now is a window with the map
of the level you wanted to edit.
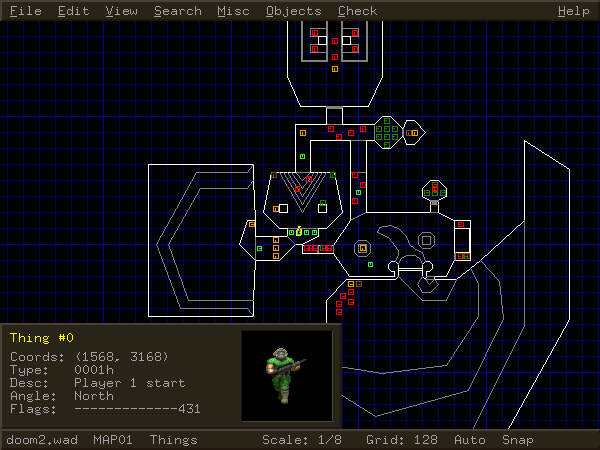
|
| Fresh Yadex window |
At the top of the window, there is the menu bar. I assume you know what a menu bar is. At the bottom of the window, there is the info bar. It displays some information about your current status : the name of the level you're editing, whether it has changed since last saved, in which editing mode you are, etc.
Try to move the pointer around. Note that the info bar shows the position of the pointer in map coordinates.
If you press [Left], [Right], [Up], [Down], [Home], [End], [Page-up] or [Page-down], the map scrolls.
You can also zoom in and out by pressing [+] and [-].
As you are now in "things" mode (as you can see on the info bar), every time you pass over a thing, it is highlighted and a window pops up in the bottom left corner of the window that shows the properties of that thing.
What if you want to change the properties of a thing ? Double-click on it or highlight it and press [Return]. A menu pops up in the top left corner of the window. Select the property you want to change and yet another window pops up. Enter the new value of the property and that's it.
You can drag things around ; click on the thing and, without releasing the button, move the pointer to where you want to move it to and then release the button. If you want to move a group of things, select them all, and drag one of them. All selected things follow.
To select several things, you can either hold [Ctrl] down and click on each of them in turn or select them all at once with a selection box. To do that, click on an empty spot and, without releasing the button, move the pointer to where you want the other corner of the box to be. Then release the button ; all the things within the box are selected.
Note that when you start a selection box, everything else is unselected. If you don't want that to happen, hold [Ctrl] down while you draw the box. Thus you can add the contents of the new box to the selection.
You can delete things by pressing [Del]. It will delete all selected things or, if there is no selection, the highlighted thing.
You can also create a new thing under the pointer by pressing [Ins]. If, at the moment you press [Ins], there is a thing highlighted, the new thing will be created with the same properties as its "model". Else, it will have the default properties as defined in the Preferences.
So far we've only edited things. Now how do we edit other objects ? As I've said before, you're in "things" mode. If you press [Tab], you will switch to the next mode, that is the vertices mode. Press [Tab] again and you are in linedefs-and-sidedefs mode. Press [Tab] again and you are in sectors mode. Press [Tab] again and you are back in things mode. You can also use [Shift-Tab] to cycle backwards through the modes and [t], [v], [l] and [s] to go directly to a particular mode.
The other modes work like the things mode except that you operate on different types of objects.
Use [g] and [G] to change the grid
step.
Use [y] if you want to be able to place
objects "off" the grid.
Click on the "Objects" item on the menu bar
or press [F9] and look at the menu that pops up.
You can also create a sector from a path of linedefs
by selecting those linedefs and pressing [Ins].
You can create a linedef between two vertices
by selecting those vertices and pressing [Ins].
Click on the "Misc" item on the menu bar or press [F8] in different modes and look at the menu that pops up.
Click on the "Checks" item on the menu bar or press [F10] and look at the menu that pops up.
If you still haven't, please make some modifications to the level. For example change some textures and light levels and add, say, a dozen of cyberdemons in the courtyard.
I want you to save the modified level to a pwad named
mywad.wad so that you can test it with Doom. To do
that, press [F2]. Don't worry, it will not overwrite
your iwad. Individual levels are always saved to a pwad. You
are prompted for a file name. Enter mywad.wad.
Before when go on, here a few things worth mentioning :
.wad extension is not automatically
appended. In addition, if you used to be a DOS/Windows user,
remember that Unix treats file names in a case-sensitive fashion
so you'd better think twice before using names like FOO.WAD.
.wad file is changed, a backup is made
in the same directory and with the same name but with the
extension .bak.
Now press [Esc]. The editing window closes and
you are returned to the Yadex prompt. From there, use the
"e" or "c" commands to edit another
level or use the "q" command to really quit Yadex.
GOTCHA: Before you test your level, you MUST run it through a nodes builder. If you don't, you'll get strange results or you'll crash the game.
There are several nodes builders around. One of the best is BSP 2.3. Lee Killough kindly allowed me to include it with the Yadex distribution. To build the nodes on your level with BSP and then test it with Doom, type something along the lines of :
$ ybsp mywad.wad -o final.wad
$ doom -file final.wad
You've tested your level and you've found that some things
need to be fixed. What do you do ? Well, go back to How do I run Yadex except that, this
time, you need to tell Yadex to load your pwad. You do that by
running Yadex with the name of your pwad as argument (you can
ommit the .wad extension). E.G. :
$ yadex -g doom2 mywad
That's it ! You've been through an entire edit-build-test-edit cycle. Doubtlessly the first of thousands :-).