NOTE: Please refer to your Poser Reference Manual for more information about the Pose room.
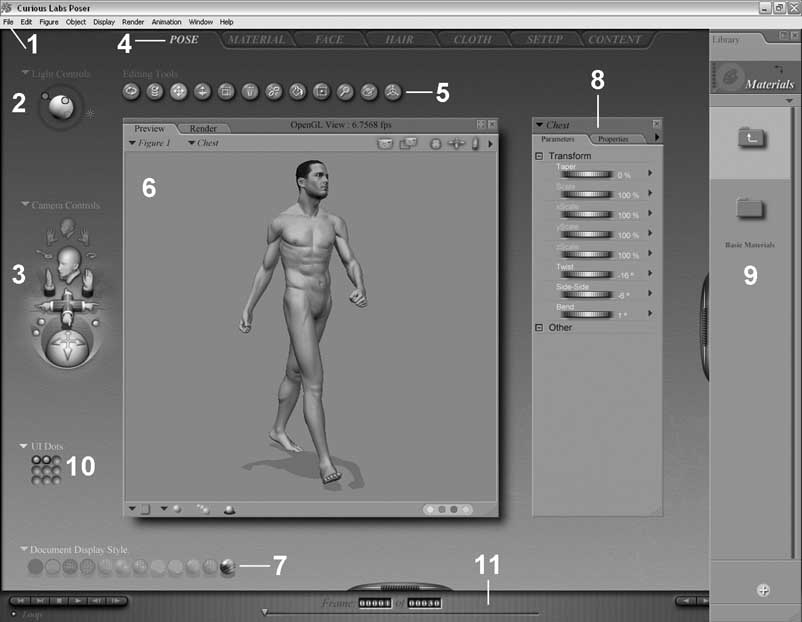
The Pose room is the focal point for much of your Poser activity. This is where you add figures and props to your scene and perform your desired posing/animation of figures and props. The numbers on the following image identify the controls available in the Pose room:
The Menu Bar (1) consists of a series of pull-down menus used for accessing Poser functionality. Some menus and/or submenus duplicate other on-screen interface elements.
The Lighting controls (2) allow you to adjust lighting properties. Use it for such purposes as adding and removing lights, and specifying light colors and other light properties.
The Camera controls (3) allow you to select and move one or more Poser cameras. There are two types of camera controls: View and Position. The topmost controls are the View controls. Clicking one of these controls activates the Face, Left Hand, or Right Hand camera, as appropriate. You can also scroll through the list of available cameras. The Position controls appear below these controls and are used to move or rotate the currently selected camera. The Camera Plane position controls move the camera along the X, Y, and/or Z axis, while the Trackball rotates the currently selected camera without changing its location in 3D space. To use the Camera controls, simply click and drag your desired control. Moving a camera does not change the locations or poses of figures, props, and other elements in your scene. A subset of these Camera controls appears in the upper-right corner of the Document window.
The Room tabs (4) allow you to switch from room to room within Poser. To enter a room, simply click its tab.
The Editing Tools palette (5) contains the tools you use most often when posing figures/props. Each Editing tool is a little different, but their basic usage is as follows: Select your desired body part or prop (referred to as an element or actor) in your scene by clicking that actor, then select the desired Editing tool. Click and drag to perform the selected tool’s function:
The Document window (6) is your viewport into the Poser Studio where you view and pose your figure and interact directly with your scene. You can position cameras to view your scene from any angle or distance and can resize the Document window to suit your needs. In addition, the Document window has numerous controls around its edges that you use to change the appearance of scene elements.
The Display controls (7) allow you to select your desired preview mode for your entire scene, a figure or prop, and/or specific elements of your currently selected figure/prop.
Poser combines the previous Properties dialog boxes and Parameter dials into a single easy-to-use palette (8). The Parameters palette contains all of an object’s parameters. Each object type has specialized parameters. The Properties palette contains all of an object’s properties. In addition to certain universal properties, each object type has specialized properties. To switch palettes, click your desired tab.
The Library palette (9) is where you access all of the content available to your installation of Poser, including both content included with Poser and any additional content you may have obtained. The palette contains categories (Figures, Props, etc.) and subcategories (People, New Figures, etc.) for organizing your Poser content. Use the Library palette to add or remove elements from your Poser scenes.
Memory dots (10) allow you to save poses, camera locations, and user interface (UI) preferences. Clicking the arrow to the left of the description allows you to select your desired set of Memory dots.
The Animation controls (11) are where you preview animations and set up keyframes. You do this by posing your figure, moving to a new frame, and changing the pose. Clicking the Play button plays an animation using the keyframes.